quarta-feira, 15 de agosto de 2012

Download AresMod

AresMod is a new version of the classic Ares, one of the most popular P2P file sharers today. This time, the program comes with an even more intelligible, with enhanced functions and lowering it so much more efficient.


The search engine has also been improved and you also has a chat room filled with people from all over the world, rescuing the best tradition of the mIRC chat style, which for years are successful in this type of program.

The installer adds it to your computer AresMod the Babylon toolbar. In addition, it modifies your default search engine and adds a new homepage on your browser. To reverse these changes, check out the following articles:


Information about the program
Size: 312 KB
License: Free and Complete Distributed by manufacturer
Version: 2.2.3


Download AresMod

How to uninstall the toolbar of Babylon computer

The uninstall procedure is fairly simple, following the patterns of removal of any other software - although this toolbar is facing browsers. The first thing to do is access the Control Panel. To do so, click the Windows Start button and press the "Control Panel" (1).


In the opened window, click on "Programs" and then select "Uninstall a program" (2). That done, a new screen appears with a list of all applications installed on the computer. You can order this relationship by software name, developer, implementation date, size of the space occupied on disk storage and program version.
The next step is to find and select the record installation of unwanted toolbar. By default, it is named as "Babylon toolbar" (3). To start uninstalling it, press the "Uninstall" button (4).
By performing this action, a message is displayed stating that you must restart the browser, if anything is open, so that the procedure is completed. Click "OK" to remove the bar of Babylon PC and then close your browser. Wait deleting all files related to that software. Okay, your machine is already without any additional application.

How to remove Babylon Search in Firefox


Many free programs offer to install search bars and add-ons for your browser during your installation itself, as a form of advertising for their sponsors.

Although in most cases, be possible to prevent it, this option is not always clear, and you could end up unwittingly authorizing this facility. Sometimes the discomfort is minor and you can easily uninstall these supplements from your browser, but there are cases that are not so simple.

The search box Babylon Search, for example, is not removed from the user ons or disable the extent and causes a page of Babylon is opened when something is directly searched by the address bar. To disable this once and for all, there is a quick and simple way, which you can check this tutorial.


First, delete all the extensions you want to remove the browser. Then close the tabs that you are using and save the addresses you do not want to lose, since this method requires you to restart the browser. Now, go to the Firefox menu and, under "Help", click "Restart with extensions disabled", as shown above.

This will not permanently disable the extensions installed, you need to be carrying out those you no longer want. This command will restart the Firefox window with a safe mode option you want and that everything is back to normal "Reset all user preferences to Firefox's default." Check this box, and restart your browser again.

terça-feira, 14 de agosto de 2012

Download FineRecovery


A program that recovers files deleted from your computer, flash drive, memory card etc..

FineRecovery is an application to recover files that have been deleted from your computer, however, should not be lost. This application can be very useful for those deleted files by mistake and want to have them back.

The FineRecovery is a nice tool to exert its function because it is well organized and owns many features that should ensure a good range of action, making it very easy to recover files.


Obviously, like all other programs of the genre, it does not guarantee 100% recovery of deleted files, but it does not hurt a last attempt to regain something important that was deleted by mistake.

Information about the program
Size: 890 KB
Version: 03/08/11


How to search the internet for the start menu

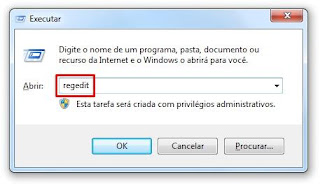
To activate the search function, it is first necessary to access the Registry Editor of your Windows. That's pretty easy, actually: just press the Windows key + R, type "regedit" (without quotes) in the window that appears and click "OK"


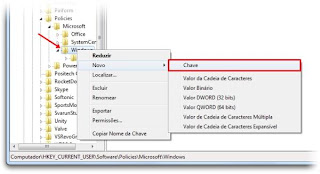
With the program open, use the list of folders on the left side of the window to access HKEY_CURRENT_USER> Software> Policies> Microsoft> Windows and find the file "Explorer". Do not despair if the item is not there: all you need to do is create it. To do this, click the right mouse button on the "Windows", choose New> Key from the context menu and name the new key as "Explorer".

 
Finding or creating a new file, proceed by clicking it right, this time choosing New> DWORD (32-bit). Name the file "AddSearchInternetLinkInStartMenu" (without quotes).


Finally, open the newly created item, change the "Value data" to 1 and click "OK" to save the change. But before the changes take effect, you will still need to restart the system (or at least Windows Explorer).


Following the steps in this tutorial, whenever you type a term into the search field of the Start Menu, the option "Search the Internet" will be available in the search results. By clicking on it, a page from your default browser opens automatically, containing the answers to your default search engine.

Enabling more options in "Send To"

When you open the context menu of a file, the "Send To" displays only some functions related to programs and units of the system, which is very little. However, if you hold the Shift key before clicking right, you can see a much longer list, with the folders most used operating system.

If even then the directory to which you want to send files is not yet available, you can open a new Windows Explorer window and type shell: sendto. On this screen, just drag shortcuts to the folders you want to access more easily and they will appear as options in the context menu.


sábado, 11 de agosto de 2012

Minecraft how to plant cocoa (cocoa beans)

The cacao (cocoa beans), in Minecraft 1.3, is found in the jungle biome specific trees. This seed can be planted in the trunks of the trees in this forest or you can remove these trunks and plant elsewhere, without leaf or not, after doing so just pick the cocoa beans and precionar right about this trunk and will planted cocoa after some time it will grow and stay dark that means it is ready to harvest when you spoon it will give 3 seeds then you use one to replant and use the other to make cookies like the images below.

Cocoa plantation.